What is Memory Limit Error?
Whenever you get an error on a WordPress site that looks like this:
Fatal error: Allowed memory size of 33554432 bytes exhausted (tried to allocate 76 bytes) in /home4/xxx/public_html/wp-includes/plugin.php on line 293
It means that you have used up the amount of Memory (RAM) assigned to PHP by your hosting provider or by your WordPress website. By default, WordPress tries to increase the amount of memory assigned to PHP to 64MB but that is not enough nowadays. So due to this, the limit assigned might be exhausted by a plugin or a theme that you are using.
So increasing the maximum memory assigned to PHP is the solution to this problem and thankfully its very easy.
Increasing PHP Memory Limit in WordPress
In order to increase the memory limit, you require access to the wp-config.php file which is located in the root folder of your WordPress website. You can access and make changes to the file using the ‘File Manager’ provided by your Hosting’s Control Panel (cPanel) or an FTP Client.
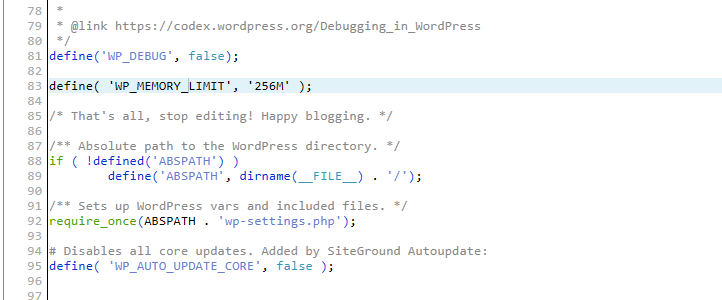
Once you’ve opened the file for editing you have to add this line
define(‘WP_MEMORY_LIMIT’, ‘256M’);
just before the comment ‘That’s all, stop editing! Happy blogging.’ Like this:

Or edit the line if it is already there in the file. You can change the size defined to any value you want. Higher than 128M is recommended if you have already got a WordPress memory limit error.
Note: The memory limit you assign is also capped by the amount of RAM assigned to your Hosting account by your Hosting Company. For Shared Hosting that amount is normally less than 1 Gigabyte.
After you are done making changes to the file, make sure to save it. Then go to your WordPress website and the error will not show up anymore.
Note: If this does not fix the error then that means your Hosting Provider does not allow PHP memory limit to be increased through WordPress configuration. Then you have contact your Hosting Provider’s Support Staff and ask them to increase the memory limit for you.


