When I started cooking there was a visible difference between cooking as per my style and cooking by following a recipe. Because I was learning, the results came out best when I followed an expert’s recipe. Blogging is similar. When you are just starting out it’s best to take advice from people who are in the picture for a long time and those who know how to handle things better.
How to write a perfect blog post
In this post, I’ll be sharing with you 10 simple steps to craft a perfect blog post. You have the ingredients but without a well-defined recipe, the results will lack. So here is the recipe for a perfect blog post.
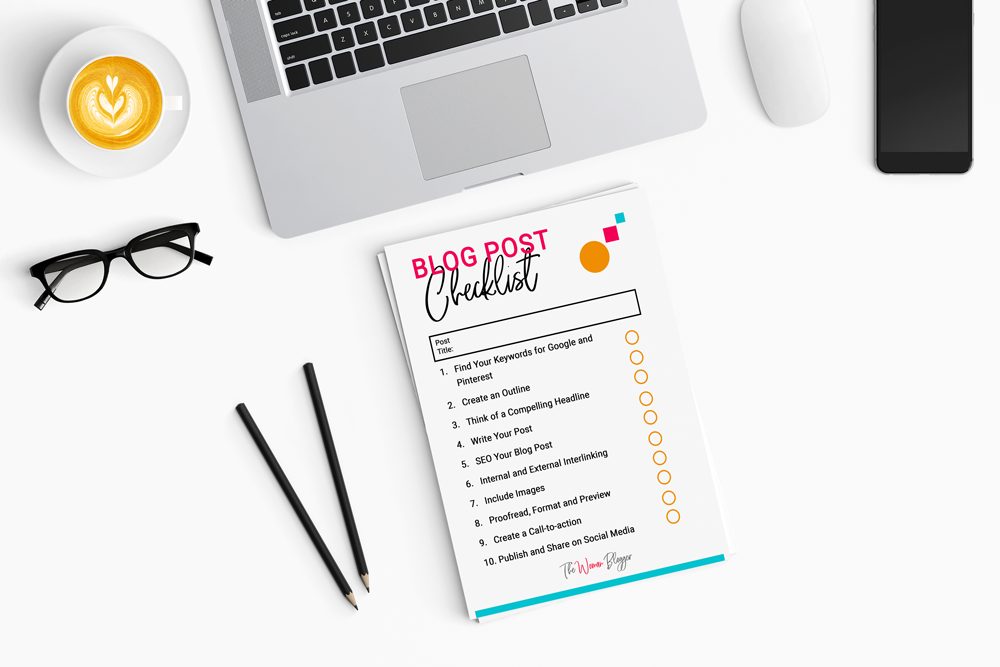
1. Find Your Keywords for Google and Pinterest
When you write always keep the readers intent in mind. Who is going to be your audience? Take out the major group and focus on it.
What are they looking for? How am I providing them value?
These are a few questions you need to ask your self before you sit down and start drafting your post.
Now, in order to reach out to your target audience, you need to know what are they searching for. The terms they are searching for are called Keywords. For instance, if someone wants to know about writing better blog posts, they might be searching for how to write a blog post.
How do we determine the best keywords for our blog post?
For Google, simply go to ads.google.com and look for Keyword Planner in the tools. Write down your target phrase and it will give you relevant keywords people usually search for.
More on this in my How to research Keywords using Google Keyword Planner post.
For Pinterest, the simplest way to go about is to use the search bar. In the search bar type your base keyword. If we continue with our example for Google, type ‘perfect blog post’ on Pinterest it will give you suggestions for what people usually search for.

2. Create an Outline
Once you have your keywords in mind go out and research for your post.
If you already know what you are going to write, the best way to start is by drafting an outline.
An outline ensures what flow you are going to take to accomplish the content you wish to write.
I simply start off with a basic outline that includes my major headings and any important points I don’t want to miss.
This outline will help you finish your blog post as you know what you are going to write about and how.
If you don’t have an outline and you just start writing you won’t have any specific direction.
Moreover, you are highly likely to leave your article midway. And you don’t want that.
You don’t have to be very specific in your outline. Just give your mind a map to follow. You can always come back to it later and make the necessary amends.
3. Think of a Compelling Headline
Whatever you write about, chances are, many other people have already written about it before you. Or are currently drafting some piece of content on the same topic. What is it that is going to drive traffic to your post?
Your headlines!
Your headlines need to have two things:
- Style – People have so many options. They will only come to you when your heading is compelling enough.
You can call ‘style’ how your heading feels when you read it.
Is it a bit too plain?
Or is it inviting enough? - Substance – It needs to fill the user’s intent and promise them maximum value. This is your headline’s main function.
If you are writing on ‘How to write a blog’ don’t go for titles like ‘How to blog’.
If you are writing on ‘How to write a blog post’ you should consider going for ’10 Step Process to Write the Perfect Blog Post’. It’s not only inviting but provides value as well.
Read more about The 8 Elements of Heavy-Hitting Blog Post Headlines.
4. Write Your Post
The step I don’t need to tell you much about is writing. A few things that you do need to keep in mind is that always write readable and user-centered content.
If you are writing for beginners keep things extremely simple to understand. Don’t use too many jargons and complicated sentences.
Space things out. Make use of headings and use various formatting options like bold/italics/highlighted text to emphasize key points.
Find out how you can make your content more readable for your audience in my most-ignored tips that can improve your blog post’s readability.
5. SEO Your Blog Post
We researched keywords in our first step. Now is the time to make sure we are doing everything to make your post SEO optimized.
If you don’t already know. Search Engine Optimization is the process of getting free and organic traffic from Google and other search engines.
In this step use the keywords you determined in step 1 in various places on your blog post like:
- URL of the blog post
- Title of the post
- Meta Description
- Headlines
- Image ALT tags
Read in more detail about how to perfectly SEO your blog post with a free checklist.
6. Internal and External Interlinking
Once you have written your post it’s important to link your post to other places on your website and other websites.
This is the best way to provide value to your audience who might need more information on a certain topic which you have already written on.
Additionally, you can link to any external site you took a reference from.
Linking to other credible sites can improve your site’s SEO.
Also, if you have any affiliate links to products or services in your post, now is the right time to insert them.
Never forget to link to your relevant products. If someone finds value in your content, chances are, they will find value in your products too.
7. Include Images
Images create a powerful visual experience for your readers.
Add relevant images/quote images to your post. If you are writing a tutorial helpful screenshots are a must. You need to help your audience get the most out of your post.
At this point in the process of drafting your post, create brand-specific social media images. It’s always nice to have a system.
If you already have templates for all your graphics you are good to go. Otherwise, you will always find your self working on your graphics and it’s a headache for non-designers and newbie bloggers. After all, all this work becomes a burden you can’t stand.
You need an image for your featured image section on your blog.
Related: Blog Feature Images Your Audience can’t ignore + 5 Free Templates
Never forget to add a Pin graphic to all your posts. This helps Pinterest users pin your content to their boards and come back to it in the future.
You need an image for Facebook/Instagram and Twitter.
Although, if you are still new I would suggest you focus on just 2 social media accounts as of now.
Pro Tip: In all the images you include to your website, don’t forget to add ALT-tags with your keywords in them. This helps in SEO.
8. Proofread, Format and Preview
You are almost there. Before you hit publish just make sure you have read and reread your post for any grammatical errors.
I use the free Grammarly app to point out crucial spelling and punctuation mistakes on the go. It’s nice to have an app check for spellings because many of us often make these simple mistakes.
Make sure all your headlines are bold enough. The font size of the headings should be bigger than the normal font size.
Break your text into paragraphs. It’s nice to have a paragraph of no more than 3-5 sentences. It improves readability.
Once you think you are done preview your blog post on your website to make sure it looks as you would like it to.
Perfect!
9. Create a Call-to-action
Create a call-to-action at the end of your posts. A reader might like your content but they will forget you the moment they leave your website.
It’s important to capture their emails via a compelling CTA (Call-to-action).
You can offer them a freebie in return for their emails. Use these emails to send out important announcements and updates to your content on your website.
10. Publish and Share on Social Media
Finally, you can hit publish and take a deep breath. You are another post ahead on your blogging journey.
This little internet corner of your home has something more to offer now.
Let the word out. Share your post with your followers on Social Media. Don’t forget to use compelling graphics. Clear and branded graphics are your voice. Our tones can change but our voice remains the same.

Need amazing looking social media graphics for your blog or business? Check out my packages here.


Wow! amazing post, Thanks for sharing!
Highly descriptive post, I loved that bit. Will there be a part 2?
norge drakt